
Electron 实现自定义弹窗通知
概述
Electron 是一个流行的开源框架,允许开发者使用 web 技术(如 HTML, CSS, 和 JavaScript)构建跨平台的桌面应用程序。内置的 Notification API 允许开发者轻松地向用户展示系统通知,但有时标准的通知样式可能不足以满足应用的特定需求或品牌要求。本文档将指导你如何在 Electron 应用中实现自定义的通知弹窗。
准备工作
确保你已经安装了 Electron 并创建了一个基础的 Electron 应用。如果你尚未开始,可以通过访问 Electron 官方网站获取快速上手指南。
使用原生 Notification API
基础用法
首先,了解如何使用 Electron 提供的基础
NotificationAPI 是很重要的。这是一个简单的示例:
const { Notification } = require('electron');

let notification = new Notification({
    title: '基本通知',
    body: '这是一条普通的系统通知。'
});

notification.show();
自定义选项
虽然
NotificationAPI 支持一些自定义,比如图标、声音等,但它主要遵循操作系统的通知样式。为了实现更深度的自定义,我们需要采用不同的策略。
实现自定义通知窗口
由于 Electron 的
NotificationAPI 受限于系统样式,对于高度自定义的通知,我们可以创建一个自定义的 BrowserWindow 作为通知窗口。
为了让我们开发过程更加顺畅,我们预想一下我们想要实现的最终呈现效果:
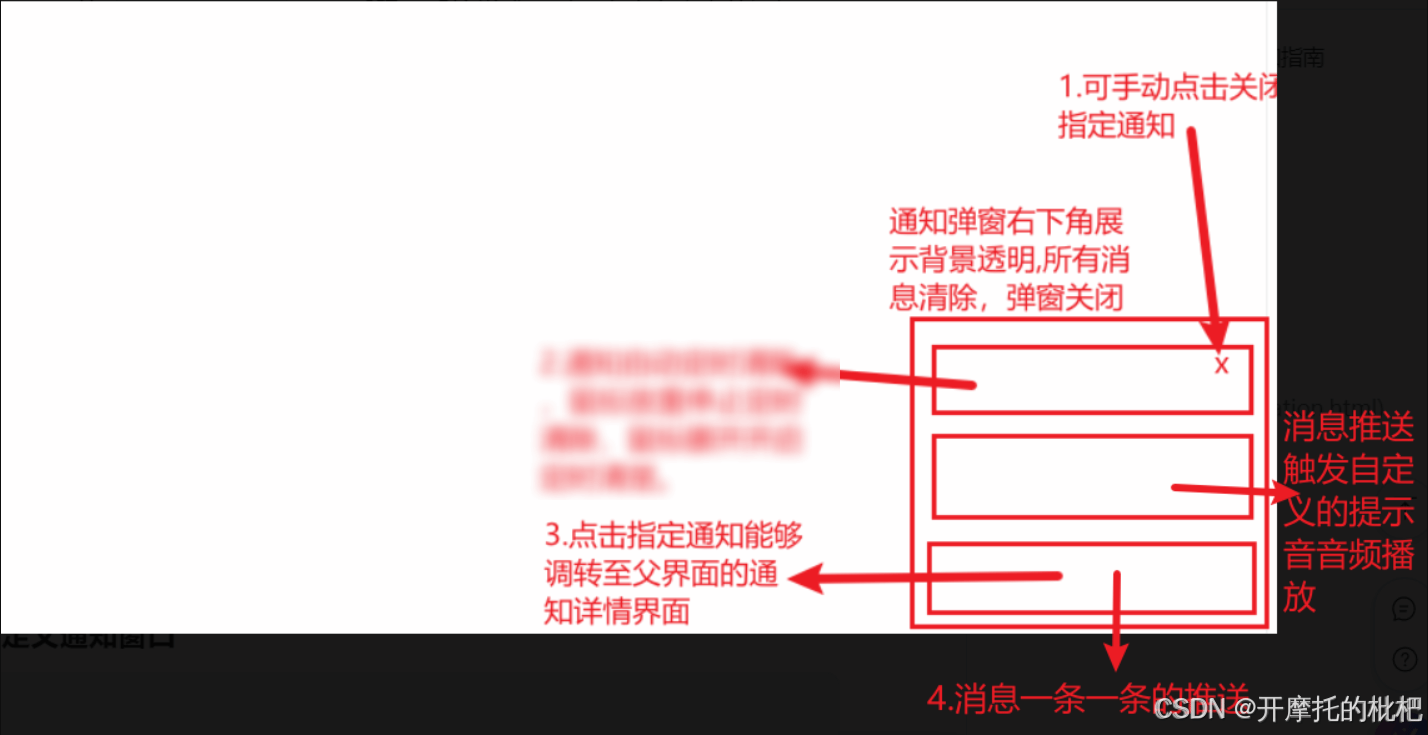
创建自定义通知窗口
const { BrowserWindow } = require('electron');
let notificationWindow

// 自定义通知窗口
const createCustomNotificationWindow = () => {
    notificationWindow = new BrowserWindow({
        width: 350,
        height: 400,
        parent: win, // 选择父元素,使自定义窗口与父窗口附着在一个窗口
        frame: false, // 隐藏窗口边框
        transparent: true, // 设置为透明窗口(可能需要配合CSS)
        show: false, // 初始时不显示窗口
        alwaysOnTop: true, // 始终置顶
        resizable: false, // 禁止调整窗口大小
        webPreferences: {
            nodeIntegration: true, // 允许渲染器进程使用Node.js
            contextIsolation: false,
            autofill: true,
        },
    })

    // 添加通知消息
    ipcMain.on('add-notification', (event, data) => {
        isNull = false
        notificationWindow.show()
        notificationWindow.webContents.send('add-notification-item', data);
    });

    // 关闭通知窗口
    ipcMain.on('hide-notification', (event) => {
        isNull = true
        notificationWindow.hide()
    });

    // 加载自定义样式文件
    notificationWindow.loadFile('./electron/notification.html') // 加载自定义的HTML文件
    // 在这里设置窗口的位置,比如右下角
    notificationWindow.setPosition(screen.getPrimaryDisplay().workArea.width - 360, screen.getPrimaryDisplay().workArea.height - 410)
}
注意
这里选择在父窗口创建时,同时创建子窗口。
app.whenReady().then(() => {
    ipcMain.handle('ping', () => 'pong')
    // 父窗口
    createWindow()
    // 自定义通知窗口
    createCustomNotificationWindow()
})
并在你需要的时候调用notificationWindow.show()展示弹窗。
自定义通知界面 (notification.html)
在上面的代码中,我们加载了一个名为
notification.html的文件,这个文件应包含你想要的自定义通知UI。例如:
首先让我们实现自定义通知的静态展示:
库引入
因为很少使用html原生开发自定义样式界面,所以我还是习惯使用vue+element开发。于是,我们通过引入的方式将需要用到的库全部写了进来。
<!DOCTYPE html>
<html lang="en">

  <head>
    <meta charset="UTF-8">
    <meta name="viewport" content="width=device-width, initial-scale=1.0">
    <!-- 引入Vue3 -->
    <script src="https://unpkg.com/vue@3/dist/vue.global.js"></script>
    <!-- 引入element-plus样式文件 -->
    <link rel="stylesheet" href="https://unpkg.com/element-plus/dist/index.css" />
    <!-- 引入element-plus组件库 -->
    <script src="https://unpkg.com/element-plus"></script>
    <!-- 引入axios -->
    <script src="https://unpkg.com/axios/dist/axios.min.js"></script>
  </head>
</html>
自定义通知样式
<html lang="en">
  <body>
    <div id="app">
      <div class="notification-index">
        <el-button type="info" class="notification-btn" @click="onIgnoreAll">忽略全部</el-button>
        <div class="notification-cell">
          <transition-group name="fade" tag="p">
            <div v-for="item in notificationList" :key="item.id" class="cell-item" @mouseenter="pauseDeleting"
              @mouseleave="resumeDeleting" @click="handleClickMessageItem(item)">
              <el-button class="item-close-btn" text
                @click.prevent.stop="handleRemoveItem(item)">x</el-button>
              <div class="item-header">
                <img class="header-img" src="../src/assets/img/logo.png" alt="">
                <span class="header-title">{{ item.title }}</span>
              </div>
              <div class="item-content">
                {{ item.body }}
              </div>
            </div>
          </transition-group>
        </div>
        <audio id="myAudio" preload="auto">
          <source src="../audio/notification.mp3" type="audio/mpeg">
        </audio>
      </div>
    </div>
  </body>
</html>
<style>
  body {
    overflow: hidden;
  }

  .notification-index {
    display: flex;
    flex-direction: column;
    width: 338px;
    height: 400px;
    overflow: hidden;
  }

  .notification-cell {
    position: relative;
    width: 100%;
    height: calc(100% - 66px);
    overflow: auto;
  }

  .cell-item {
    position: relative;
    margin-bottom: 8px;
    border-radius: 4px;
    padding: 8px;
    height: 88px;
    background-color: #f1f1f1;
    cursor: pointer;
  }

  .cell-item:hover {
    transform: scale(0.99);
  }

  .item-close-btn {
    font-size: 14px;
    color: #000;
    position: absolute;
    right: 0;
    top: 0;
  }

  .item-header {
    display: flex;
    align-items: center;
  }

  .header-img {
    height: 16px;
    width: 16px;
  }

  .header-title {
    margin-left: 4px;
    font-size: 12px;
  }

  .item-content {
    margin-top: 12px;
    font-size: 14px;
    color: #000;
    word-break: break-all;
    display: -webkit-box;
    -webkit-line-clamp: 3;
    -webkit-box-orient: vertical;
    overflow: hidden;
    text-overflow: ellipsis;
  }

  .notification-btn {
    height: 50px;
    width: 100%;
    background-color: #f1f1f1;
    border: none;
    border-radius: 4px;
    color: #000;
    border: 1px solid #f1f1f1;
  }

  /* 自定义整个滚动条 */
  ::-webkit-scrollbar {
    display: none;
  }

  .fade-enter-active,
  .fade-leave-active {
    transition: opacity 0.5s;
  }

  .fade-enter,
  .fade-leave-to {
    opacity: 0;
  }
</style>
事件逻辑实现
<script>
  const { createApp, ref, onMounted, onUpdated } = Vue;
  // 使用 setup 函数的 Vue 组件
  createApp({
    setup() {
      // 响应式状态
      const notificationList = ref([
        {
          title: 'xx通知',
          body: '演唱会结束以后,体育馆门口聚集了大量的歌迷,他们在彼此分享会唱的歌曲。。'
        },
        {
          title: 'xx通知',
          body: '学校组织的特色主题活动上,有很多学生聚集在一块。'
        },
        {
          title: 'xx通知',
          body: 'xxx'
        }
      ]);

      // 暴露给模板的响应式属性和方法
      return {
        notificationList
      };
    },
  }).use(ElementPlus).mount('#app');
</script>
至此你能得到一个自定义样式的静态通知弹窗,如图:
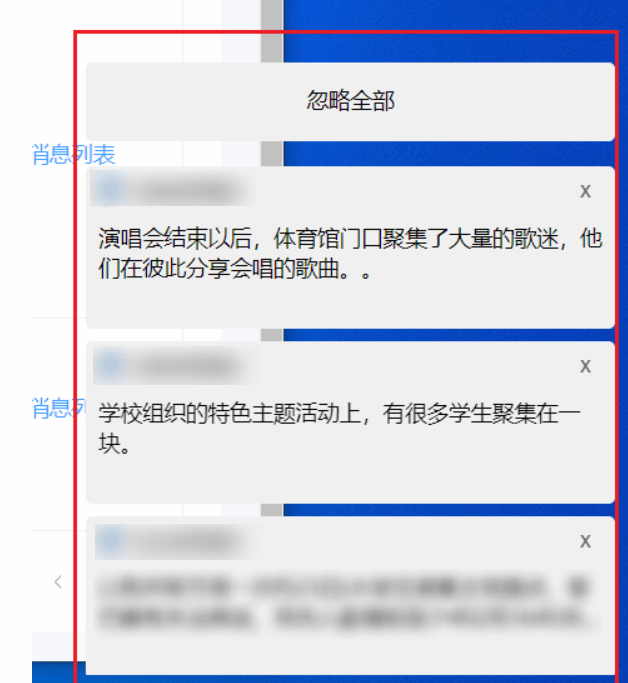
接下来只需要实现消息动态化就行了。。。
结论
通过上述步骤,你可以实现在 Electron 应用中展示自定义样式的弹窗通知。这种方法提供了极大的灵活性,使得通知能够更好地与应用的品牌风格保持一致,同时也能满足特殊的功能需求。记得在开发过程中充分测试不同平台下的兼容性和用户体验。


不错不错可以我看不懂